03 March 2024
Claudio Contin
Introduction
Keeping offensive open source tools up to date with the latest changes, as well as ensuring they do not get flagged as malicious by common Antivirus (AV) solutions, can be a tedious task.
In this post I will cover the steps required to automate the checkout of the latest version of the SharpWMI (C# implementation of various WMI functionality) open source .NET project using JetBrains TeamCity tool, automate the source code modification using PowerShell and obfuscate the compiled .NET assembly using Babel Obfuscator to bypass common AVs.
A massive shutout to Rasta Mouse and ZeroPointSecurity for their DevOps for Pentesters course which I have completed some time ago. Their course inspired me to implement automation for tools frequently utilised in Active Directory penetration testing. Please note that this post will not cover the setup steps for TeamCity or the basics of the tool. However, if you are interested, ZeroPointSecurity's training extensively covers these topics.
Let's get detected
Before starting using TeamCity and automating the process, we need to understand what changes we need to apply to the original code base of the project to avoid detection. Let's start by disabling Defender Automatic sample submission setting, creating a Windows Defender exclusion for the folder where we check out the project and git clone the GitHub repository:
git clone https://github.com/GhostPack/SharpWMI.git
x64 Native Tools Command Prompt, we can use msbuild to compile the project as it is:
msbuild SharpWMI.sln /p:Configuration=Release /p:Platform="Any CPU" -restore -noLogo
copy SharpWMI.exe \Temp\s.exe
C:\Users\Public\tools\ThreatCheck\ThreatCheck\ThreatCheck\bin\x64\Release\ThreatCheck.exe -f c:\temp\s.exe
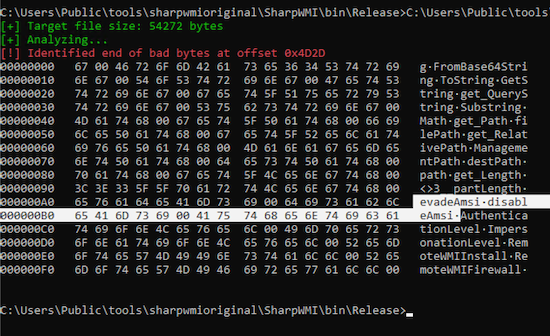
As we can see from the result, it appears that the evadeAmsi and disableAmsi could be the trigger for this detection.
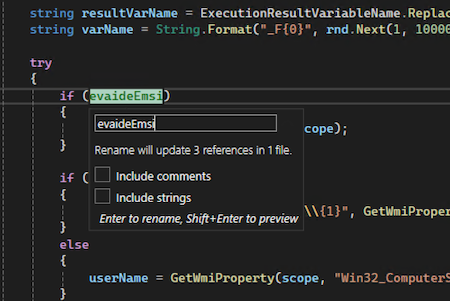
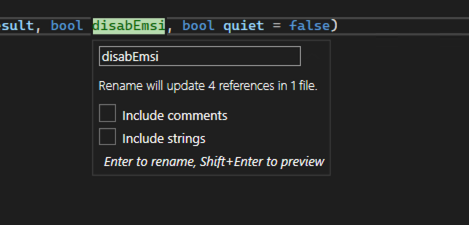
Let's open the project in Visual Studio, or any text editor, and rename the evadeAmsi variable to evaideEmsi and disableAmsi to disabEmsi. Then recompile the code and perform the same check with ThreatCheck.
When we run ThreatCheck we can see that the executable is still detected, but the offset is slightly different from the previous run.
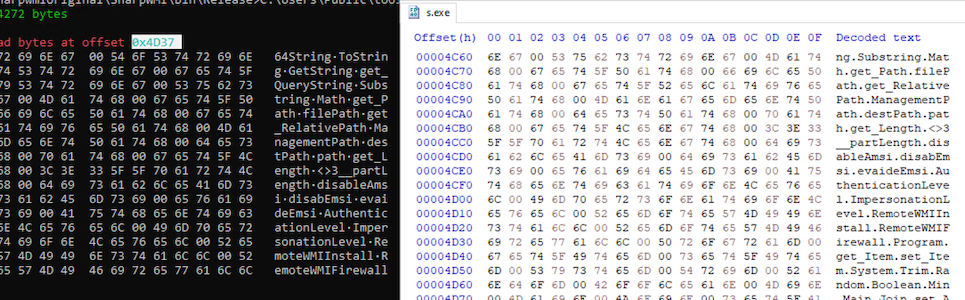
It appears that this detection is possibly triggered because the RemoteWMIFirewall and maybe the RemoteWMIInstall function or variable names.
Let's repeat the same steps and rename them to RemotWMIFirewol and RemotWMIInstell, recompile and run ThreatCheck again.
This time ThreatCheck result is: [x] File is malicious, but could not identify bad bytes, which indicates Defender still flags it as malicious, but we are unsure about the exact details.
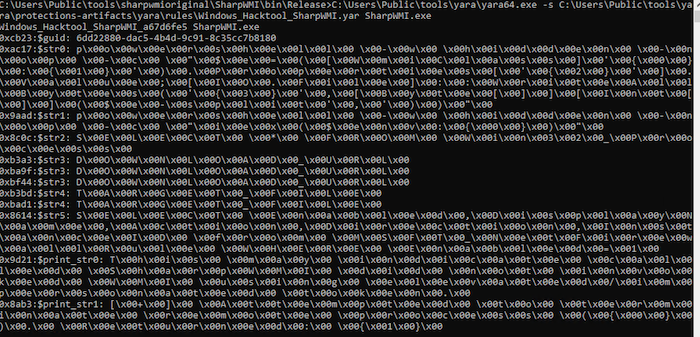
Let's leave it like this for now, and let's look into Yara instead. Yara is used to identify and classify malware samples. Elastic Security for Endpoint released their set of Yara rules they use to identify malware. The rule specifically related to SharpWMI is: https://github.com/elastic/protections-artifacts/blob/main/yara/rules/Windows_Hacktool_SharpWMI.yar. The below is extracted from their public Yara Rule:
$guid = "6DD22880-DAC5-4B4D-9C91-8C35CC7B8180" ascii wide nocase
$str0 = "powershell -w hidden -nop -c \"$e=([WmiClass]'{0}:{1}').Properties['{2}'].Value;[IO.File]::WriteAllBytes('{3}',[Byte[]][Int[]]($e-split','))\"" ascii wide
$str1 = "powershell -w hidden -nop -c \"iex($env:{0})\"" ascii wide
$str2 = "SELECT * FROM Win32_Process" ascii wide
$str3 = "DOWNLOAD_URL" ascii wide
$str4 = "TARGET_FILE" ascii wide
$str5 = "SELECT Enabled,DisplayName,Action,Direction,InstanceID from MSFT_NetFirewallRule WHERE Enabled=1" ascii wide
$print_str0 = "This may indicate called SharpWMI did not invoked WMI using elevated/impersonated token." ascii wide
$print_str1 = "[+] Attempted to terminate remote process ({0}). Returned: {1}" ascii wide
Let's not get detected
Based on the above Yara checks, we can determine that the first rule is based on the assembly GUID, which can be modified by changing the Properties/AssemblyInfo.cs file of the project.
[assembly: Guid("6dc22880-dac5-4b4d-9c91-8c35cc7b8180")]
powershell commands, we can just simply add some spaces in the command, such as powershell -w hidden -nop -c. We can do the same for the WMI queries, which will not break the functionality.
The last two Yara rule checks are related to hardcoded console output strings, which we can just simply modify to other values: add spaces, remove/add/change one single character in the string, or anything you can come up with.
Inspecting the source code, we can see that the DOWNLOAD_URL and TARGET_FILE are related to the template of VBS commands. The strings will be replaced depending on the argument passed to the program at runtime. Since these strings are unique in the program, we can just simply rename all their instances to something like DOWNLOD_UARL and TARGT_FAIL.
Let's apply these modifications, recompile and run Yara again.

No output from Yara means that we managed to bypass these checks. Let's try to run ThreatCheck against the new executable compiled.

This time we have a clean result from ThreatCheck.
Re-enable Defender, and try to scan it using the AMSI engine, with ThreatCheck again.

With no Defender detection, it appears that we are all good to start automating these steps into TeamCity. At this point we did not change the namespace of the project, which is still SharpWMI, and the final executable name. We can apply these changes directly to the VisualStudio project, but we will perform them during the TeamCity automation steps, to speed up the work. The reason to change these details is that other AV or EDR engines might flag the program as malicious just based on these properties. It is also typically useful, to avoid detection, to remove the help output of the tool. The text contained in the help output of open source tools is often used to flag them as malicious.
Let's automate
Authenticate to TeamCity, and add a new project. For Version Control settings, let's point to the GitHub repository:
- https://github.com/GhostPack/SharpWMI
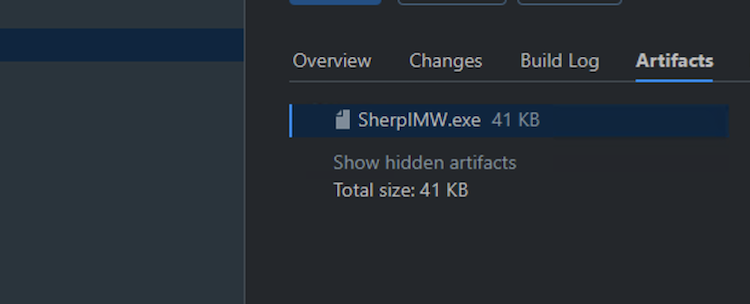
MSBuild option for compilation, and Release as the Configuration.For the
Artifact paths, let's specify:SharpWMI\bin\Release\SherpIMW.exe
SherpIMW.exe will be the executable name, project name and namespace we will choose for the project, rather than the default value.
Build Steps
TeamCity Build Steps allow us to perform a series of actions prior and after the compilation of the .NET project.
I came up with 8 steps, including the compilation one, for this project. Let's review them.
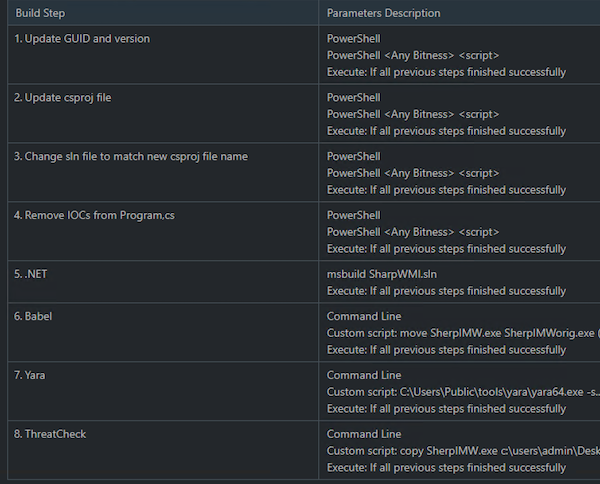
Update GUID and version
The first step is a PowerShell script that updates the GUID and assembly version of the project:
$assemblyinfo = ".\SharpWMI\Properties\AssemblyInfo.cs"
$content = Get-Content -Path $assemblyinfo -Raw
$content = $content -Replace "6dd22880-dac5-4b4d-9c91-8c35cc7b8180", "6cc22880-dac5-4b4c-9c11-8d35dd7b8180"
$content = $content -Replace "1.0.0.0", "2.1.1.1"
$content | Set-Content -Path $assemblyinfo
Update csproj file
The second step is another PowerShell script that will update the project file name.
cp ".\SharpWMI\SharpWMI.csproj" ".\SharpWMI\SherpIMW.csproj"
rm ".\SharpWMI\SharpWMI.csproj"
$csprojfile = ".\SharpWMI\SherpIMW.csproj"
$content = Get-Content -Path $csprojfile -Raw
$content = $content -Replace 'SharpWMI', 'SherpIMW'
$content | Set-Content -Path $csprojfile
Change sln file to match new csproj file name
For this step, I am updating the VisualStudio solution file to ensure it will point to the new project file we renamed in the previous step, as well as changing the project name to SherpIMW. PowerShell is used again for this.
$slnfile = ".\SharpWMI.sln"
$content = Get-Content -Path $slnfile -Raw
$content = $content -Replace '"SharpWMI"', '"SherpIMW"'
$content = $content -Replace "SharpWMI.csproj", "SherpIMW.csproj"
$content | Set-Content -Path $slnfile
Remove IOCs from Program.cs
In this step, I perform source code variables, functions, and strings replacement using PowerShell and regular expressions. Also, this step removes the help console output of the tool.
$programcs = ".\SharpWMI\Program.cs"
$content = Get-Content $programcs -Raw

$pattern = "namespace SharpWMI"
$newValue = "namespace SherpIMW"
$content = $content -replace $pattern, $newValue

$pattern = "static void Usage\(\)\r?\n.*\{([^{}]*)\}"
$newValue = "static void Usage(){}"
$content = $content -replace $pattern, $newValue

$pattern = '"DOWNLOAD_URL"'
$newValue = '"DOWNLOD_UARL"'
$content = $content -replace $pattern, $newValue

$pattern = '"TARGET_FILE"'
$newValue = '"TARGT_FAIL"'
$content = $content -replace $pattern, $newValue

$pattern = 'RemoteWMIFirewall'
$newValue = 'RemotWMIFirewol'
$content = $content -replace $pattern, $newValue

$pattern = "SELECT Enabled,DisplayName,Action,Direction,InstanceID from MSFT_NetFirewallRule WHERE Enabled=1"
$newValue = "SELECT  Enabled,DisplayName,Action,Direction,InstanceID   from   MSFT_NetFirewallRule WHERE Enabled=1"
$content = $content -replace $pattern, $newValue

$pattern = "select * from Win32_Process where"
$newValue = "select  *   from     Win32_Process   where   "
$content = $content -replace $pattern, $newValue

$pattern = "Attempted to terminate remote process "
$newValue = "Attempted to terminait remot proces "
$content = $content -replace $pattern, $newValue

$pattern = "evadeAmsi"
$newValue = "evaideEmsi"
$content = $content -replace $pattern, $newValue

$pattern = "powershell -w hidden -nop -c "
$newValue = "powershell   -w    hidden    -nop    -c    "
$content = $content -replace $pattern, $newValue

$pattern = "This may indicate called SharpWMI did not invoked WMI using elevated"
$newValue = "This may indicate called Sherp did not invoked WMI using elevated"
$content = $content -replace $pattern, $newValue

$pattern = "disableAmsi"
$newValue = "disabEmsi"
$content = $content -replace $pattern, $newValue

$pattern = "RemoteWMIInstall"
$newValue = "RemotWMIInstell"
$content = $content -replace $pattern, $newValue

$content | Set-Content -Path $programcs
.NET
This is the default MSBuild step to compile the project. No changes are needed.
Babel
This is a command execution step to run Babel Obfuscator on the resulting compiled assembly. In this example I am simply using the default free version of the tool, with default options. The working directory of the step is set to:
%teamcity.build.checkoutDir%\%system.teamcity.projectName%\bin\Release
move SherpIMW.exe SherpIMWorig.exe
"c:\Program Files\Babel\babel.exe" --output .\SherpIMW.exe SherpIMWorig.exe
del SherpIMWorig.exe
Yara
This is another command execution step to ensure that the Elastic Yara rule for the tool does not detect our modified program. For the working directory of the step we use the same value as the previous step. The script is:
C:\Users\Public\tools\yara\yara64.exe -s C:\Users\Public\tools\yara\protections-artifacts\yara\rules\Windows_Hacktool_SharpWMI.yar SherpIMW.exe
ThreatCheck
The last command execution step copies our program to a folder which is not in the Defender exclusions and run ThreatCheck. Note that if the file is detected by Defender, it will likely gets deleted from the destination folder prior us being able to run ThreatCheck against it. We will catch this fail build case later with the Failure Condition settings. The script content of this last step is:
copy SherpIMW.exe c:\users\admin\Desktop\
C:\Users\Public\tools\ThreatCheck\ThreatCheck\ThreatCheck\bin\x64\Release\ThreatCheck.exe -f c:\users\admin\Desktop\SherpIMW.exe
C:\Users\Public\tools\ThreatCheck\ThreatCheck\ThreatCheck\bin\x64\Release\ThreatCheck.exe -f c:\users\admin\Desktop\SherpIMW.exe -e AMSI
del c:\users\admin\Desktop\SherpIMW.exe
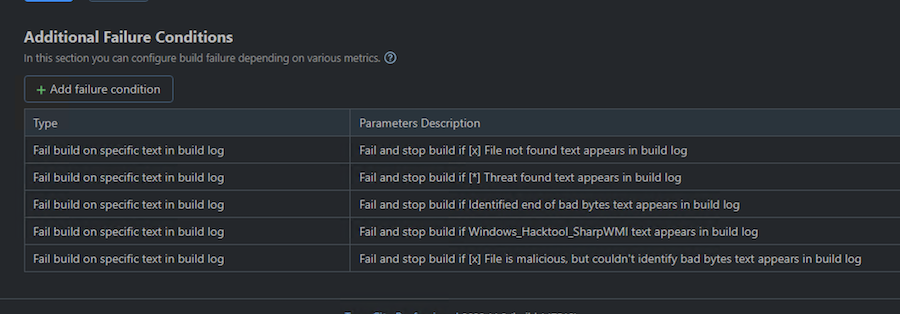
Failure Conditions
Failure Conditions allow to mark the build as a failure and do not publish the artifact when the defined condition(s) occur. In our case we are mainly interested to ensure that the final build bypasses the Yara rule and the Defender scan.
We determined that if the Yara rule detects the file as SharpWMI, it will return the string Windows_Hacktool_SharpWMI.
We can create a condition that checks if the Windows_Hacktool_SharpWMI is present in the build log. If yes, the remaining steps will be cancelled, and the build will be marked as fail.
The following are the five strings that, if found in the build log, will mark the build as unsuccessful (the last four relate to ThreatCheck):
- Windows_Hacktool_SharpWMI
- [x] File not found
- [*] Threat found
- [x] File is malicious, but couldn't identify bad bytes
- Identified end of bad bytes
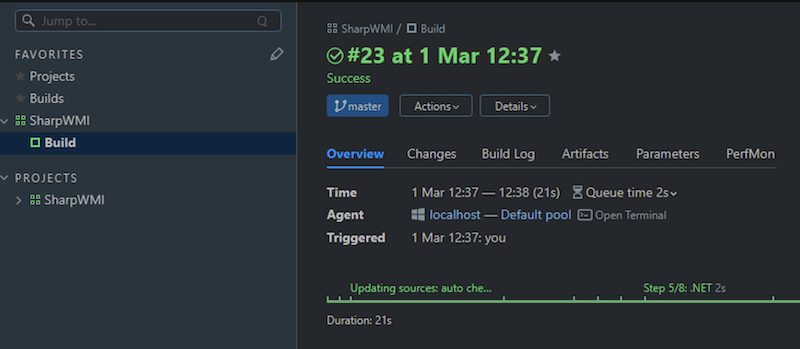
Result
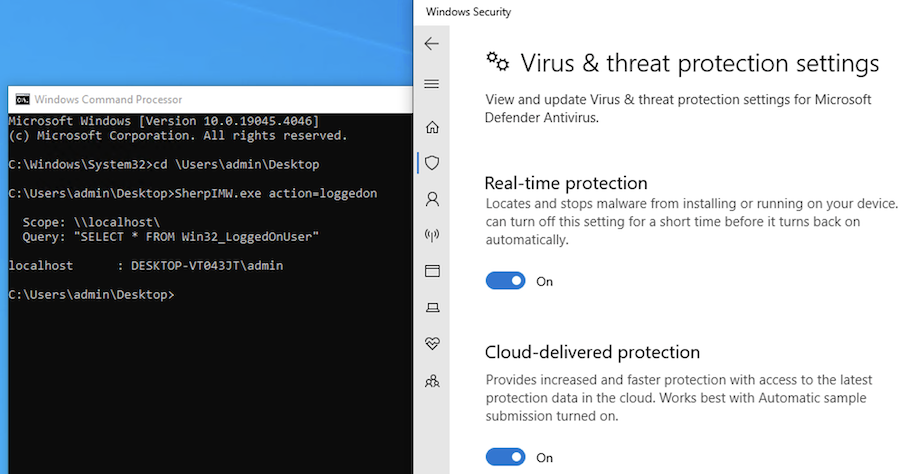
After a build has successfully run, the artifact can be downloaded from TeamCity and run.
The screenshot below displays the artifact successfully bypassing Windows Antivirus:
In addition, I attempted to run the artifact on a host with Microsoft Defender for Endpoint, and this attempt was also successful, as shown in the screenshot below:
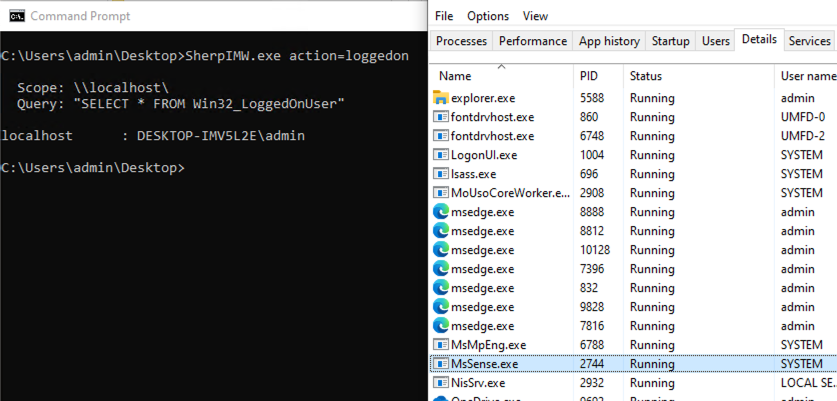
A top tier EDR product, which we will not disclose, was also tested and the program was not detected or blocked when executed.
 Claudio Contin - Principal Consultant